What happens after you submit a lead
Last updated: November 7, 2026
What this is
When you upload leads, Audyence checks each one automatically before the buyer sees it. This article explains each step of that check, what every lead status means, and what (if anything) you need to do.
Key takeaway: Every lead you upload is checked, queued for a buyer, and ends up in one of six statuses. You can watch this on the Delivery tab. Only two statuses need action from you: Rejected (review the reason and fix the problem) and Returned (replace the lead within 7 days). You can export all your leads to a CSV file from the same tab.
Words to know
Validation: the automatic checks every lead goes through.
Suppression list: a list of contacts that must not be sent (for example, people who opted out).
Multi-touch campaign: a campaign that needs an extra action from the contact (like a follow-up open, click, or form submission) before the lead is sent.
Delivery window / batch: the scheduled time when queued leads are sent to the buyer.
Allocation: the part of the campaign budget given to you.
What happens after you click Upload Leads
Submission: your file (or API call) arrives in Audyence.
Automatic checks (validation): schema checks, format checks, duplicate checks, suppression lists, and the campaign's own qualification rules. These all run in seconds.
Queue and buyer review: leads that pass are queued for the next delivery window, or held for an extra engagement on multi-touch campaigns. Then the buyer can see them.
Buyer decision: the buyer approves the lead (it counts toward your delivery total) or returns it.
Replacement: if a lead is returned, you have 7 business days to replace it. Queued leads are moved up automatically to fill the gap.
You can watch this live on the Delivery tab of any campaign. Every lead has a status that shows where it is and what you need to do, if anything.
Lead statuses
Status | What it means | What you do |
|---|---|---|
Validating | The lead was submitted and is going through the automatic checks. | Nothing. Check back shortly. |
Queued | The lead passed all checks but is waiting. Either it's waiting for the next batch window, it's being held for an extra engagement (multi-touch campaigns), or your allocation is at its budget limit. In that last case, queued leads are released automatically if the buyer adds budget to the campaign. | Nothing. It moves automatically. |
Pending | The lead passed all checks and is ready for the buyer to review. | Nothing. Wait for the buyer's decision. |
Approved | The lead passed all checks and the buyer approved it. It counts toward your delivery total. This is final. | Nothing. You've delivered. |
Rejected | The lead failed one or more checks. | Read the rejection reason and fix it if you can. This improves your quality rating. Rejection reasons are visible on the Achiever and Earner plans. |
Returned | The buyer reviewed the lead and sent it back. It must be replaced within 7 business days. If you have Queued leads, they're moved up automatically. | Replace it, or let your queue fill the gap automatically. |
Warning: A Returned lead must be replaced within 7 business days. If you have Queued leads, they're moved up automatically to fill the gap.
Why it works this way
Checks happen first, not last. Problems with schema, format, duplicates, and suppression lists are caught before the buyer sees the lead. That means fewer surprises later and a better approval rate for you.
Your queue is a backup supply. If a buyer returns a lead, Audyence automatically sends the next eligible lead from your queue. The 7-day replacement window is for when your queue is empty.
Multi-touch campaigns hold leads on purpose. If the campaign needs an extra engagement (a follow-up open, click, or form submission), seeing Queued is normal. The lead is waiting for that action. It isn't stuck.
Leads also queue when your allocation hits its budget limit. If you upload more leads than your budget covers, the extra leads wait in Queued. They're released automatically if the buyer increases the campaign budget. You don't need to do anything.
Approved is final. An approved lead counts toward your delivery total and your campaign progress bar. It won't be reversed later.
How to get more leads approved
The biggest thing you can do is act on Rejected leads. Each rejection has a specific reason, such as:
wrong job title
suppression match
invalid email domain
missing field
Most reasons point to something you can fix, like tightening your audience filters, updating how you handle suppression lists, or fixing the field mapping in your upload file.
Important: Rejection reasons are included on the Achiever and Earner plans. Starter accounts can see that a lead was rejected, but not why.
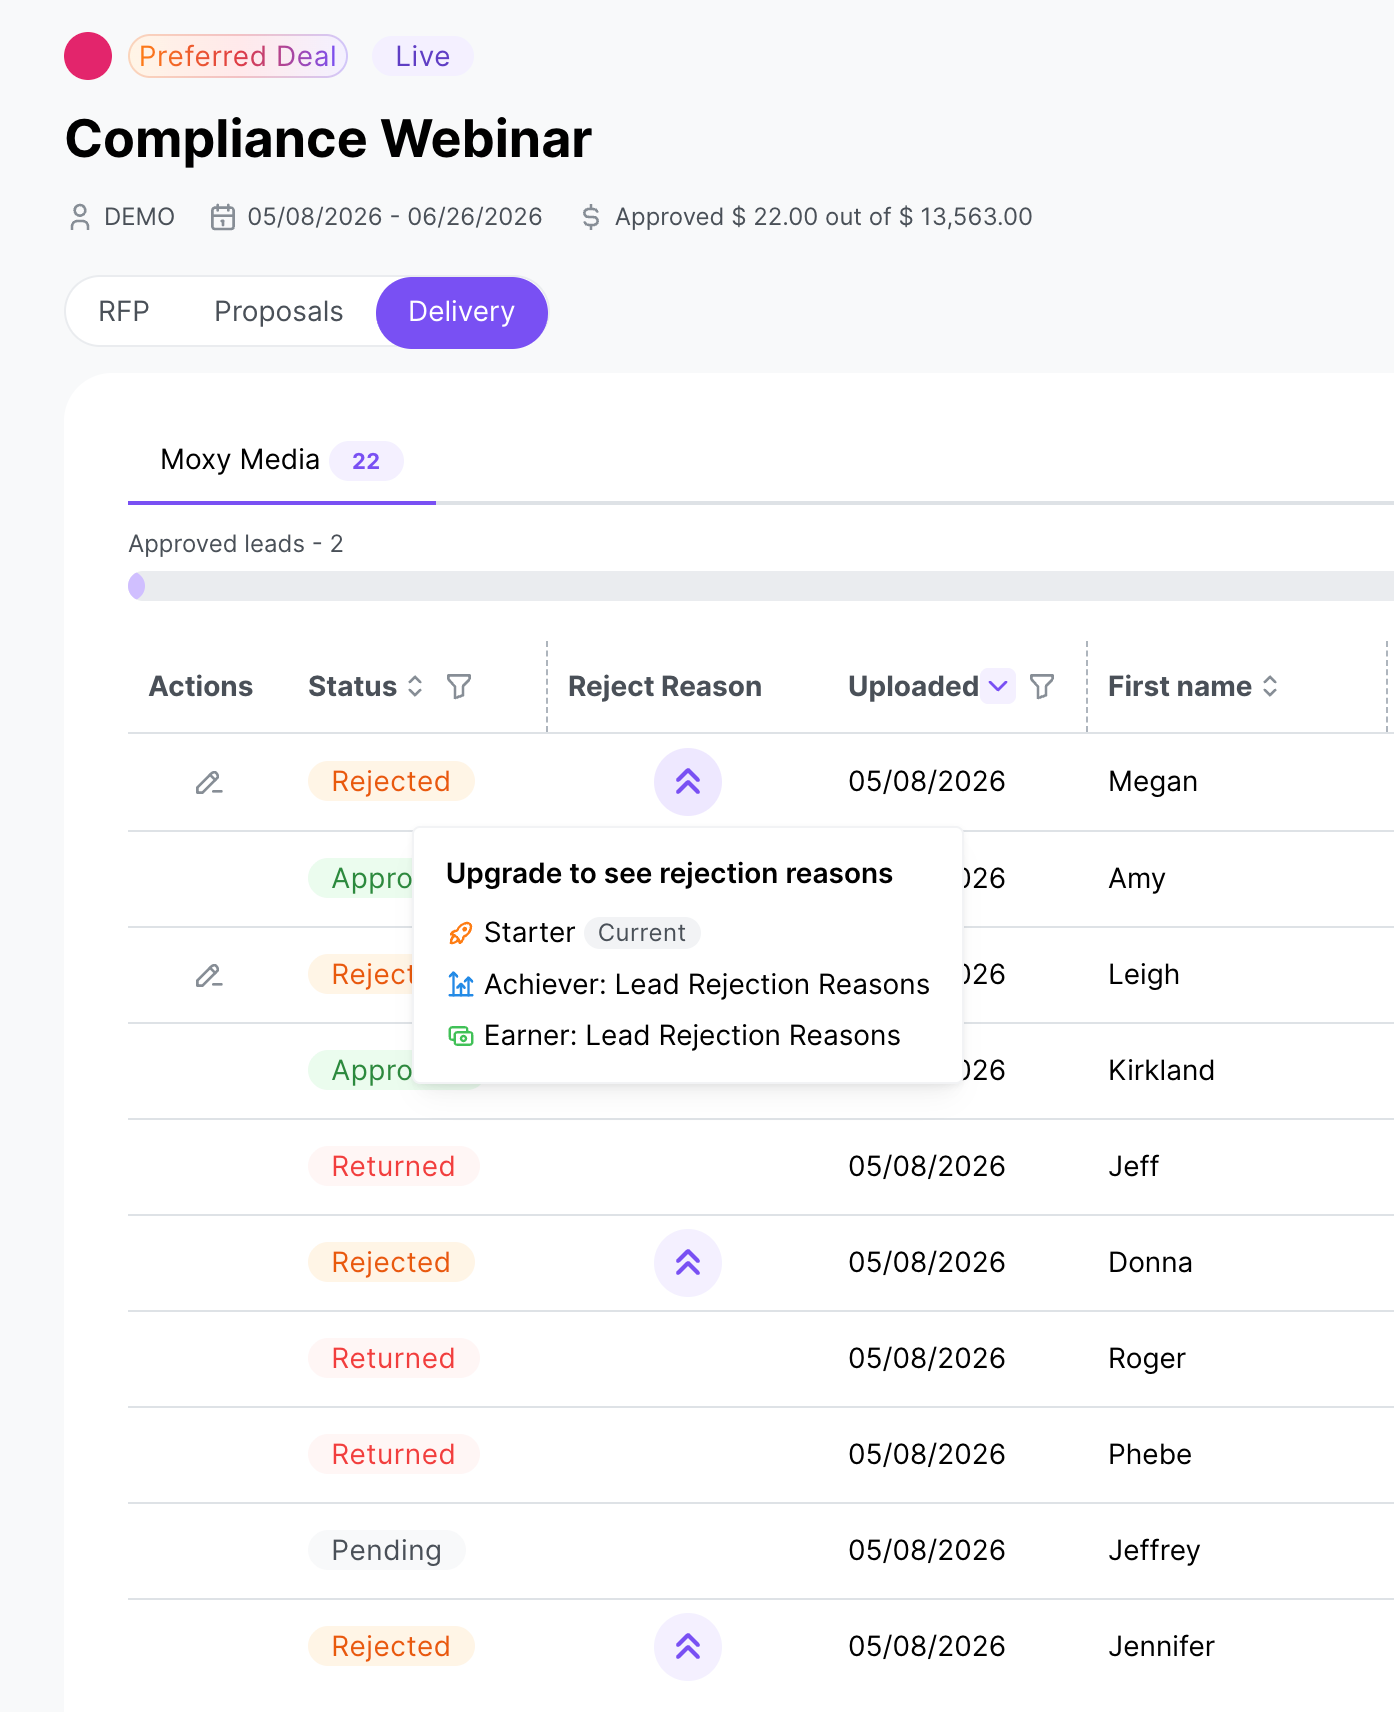
Where to see everything: the Delivery tab
Note: The Delivery tab: open any campaign and click the Delivery tab to download the campaign's CSV template, upload leads, track your approved leads against the goal, and see each lead's live status and rejection reason. Click Export to download every lead you've uploaded, in any status, as a CSV with Lead Status, Rejection Reason and Lead Uploaded Date columns.
In detail, you'll see:
your approved-lead count compared with the campaign goal
a row for every lead you've uploaded, with its live status
Pacing: whether you're on track to reach the goal by the campaign end date
Stats: approval rate, rejection breakdown, and returns over time
Upload Leads: add more leads whenever you're ready
Export: download every lead you've uploaded for the campaign as a CSV file, with status, rejection reason, and upload date
If a status changes while you're on the page, the row updates. You don't need to refresh.
Export your leads
Use Export when you need your lead data offline. For example, to compare accepted and rejected counts, for weekly reports, or to look for rejection patterns.
Open the campaign and go to the Delivery tab.
Click Export.
You get one CSV file with every lead you've uploaded for that campaign. There are no filters and nothing to set up.
What's in the file
One row per uploaded lead, in any status (including Validating).
All the fields you see on screen, plus three extra columns: Lead Status, Rejection Reason (filled in for rejected leads, blank otherwise), and Lead Uploaded Date.
Good to know
When the button appears: as soon as the campaign has at least one lead uploaded by you.
File format: CSV, UTF-8 encoded, so accented and international characters open correctly in Excel. The file name is
{campaign-name}_leads_{YYYY-MM-DD}.csv.Large campaigns: very large exports are built in the background. You can keep working and download the file when it's ready.
Snapshot: the file shows statuses at the moment you click Export. Export again any time for a fresh copy.
Rejection reasons in the export are visible on the Achiever and Earner plans, the same as on screen.
Quick reference
If you see… | Do this |
|---|---|
Validating / Queued / Pending | Wait. No action needed. |
Approved | Done. It's counted. |
Rejected | Check the reason, fix the problem, and upload again. |
Returned | Replace it within 7 business days, or let your queue fill the gap automatically. |